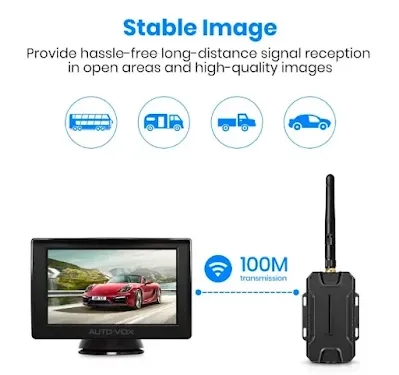
Today I will install the AUTO-VOX M1W Wireless back up camera in my Yeti.
It will compliment the Pioneer VREC-170RS dash cam that I recently installed.
I've settled on a wireless camera so that I don't have to try hiding a cable from my Yeti's rear through to the centre console
The M1W from AUTO-VOX looks perfect. Massive amount of positive reviews. I'll have it.I order and it arrives fast.

 |
Click to view the AUTO-VOX M1W Wireless back up camera on Amazon |
Let's get installing.
I'll start with the 4.3" monitor.
I remove my gear shift gaiter...

Yes. This little cubby space at the foot of my centre console I never really use.
The monitor fits snugly - no gluing or anything. Perfect.

I cut a hole at the back of the cubby space for the monitor's cable...

With the plastic shavings cleaned away now let's feed the monitor cable through the freshly cut hole then underneath the cubby space compartment and into the gear shift area.

And now... a potential problem, averted 👀
This AUTO-VOX M1W monitor comes with a male cigarette lighter connector end.

Regular readers will know that I use my Yeti's 12v cigarette socket for my Pioneer dash camera that I installed two years ago.
So when ordering this AUTO-VOX back up cam I also ordered an adapter: fag lighter female to USB male.

I connect the AUTO-VOX and tuck the cables and connector away inside the console...
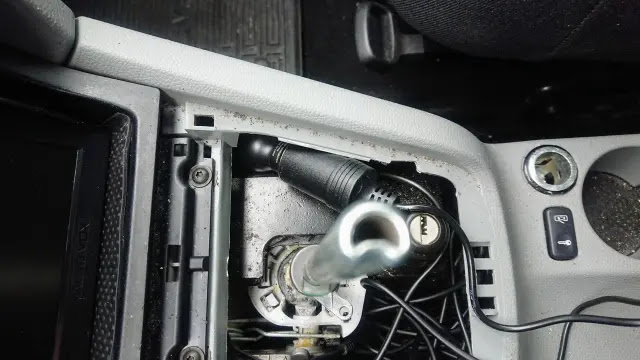
Now I can continue to use the cigarette lighter end from my Pioneer dash camera with its built in USB socket.
I will plug the AUTO-VOX reversing cam into that.
It has a Red LED on light, too.

Now I will use my tiny file to create two small channels for both my dash cam and backup cam cables.

BOOM!


And so the the rear.
I start by locating which bulb is the reversing light and I connect two wires: live plus ground

Tomorrow, a mate of mine will let me use his dad's garage where I can solder these wires properly.


Now I need to feed the new wires upwards and towards my boot area.
Well well... made in Ukraine - 19-03-2010

This is the best way I can keep the wires neat and safe.

I got a bit engrossed (or eager to finish) here so many of the final pictures I took were either blurred or my finger partially covered the lens
Unusable, basically.😕
I place the AUTO-VOX wireless unit here and connect the reversing light wires from the previous step...

Push down hard.
The included double-sided sticky pad should ensure it never falls off.
I point the antenna towards the front of my Yeti

Again, I can't show you much of these final steps because of blurring or because of my rogue finger.
What I do:
- remove the interior boot panel trim
- feed the reversing camera wires through a hole behind SPZ (reg plate)
- connect those wires to the cable coming from the wireless unit
- peel the backing off of the double-sided sticky pad on the back of the rear camera
- once happy with the alignment push on the camera and it is affixed

Nicely concealed from prying eyes. 👍

BOOM! (again)

Extensive testing reveals no high latency issues. Yay!
Thanks for visiting.
And feel free to stay tuned for more Yeti modifications I have planned.
Here's the AUTO-VOX M1W Wireless Reversing Camera if you want to check the price...
 |
Click to view the AUTO-VOX M1W Wireless back up camera on Amazon |
Need something else for your Yeti?
Amazon currently lists HUNDREDS of Yeti Parts & AccessoriesIf you buy something from one of these links, you will not pay a penny more.
I will get a small commission, although not every time.
The extra pennies help me to pay the annual cost of the domain name.
I thank you for your support.
See the reversing camera in action on the Skoda Yeti dot-net YouTube channel